Got my new Buskins Capri Leggings today
Click on my below link to order a pair of leggings.
Also find out how to get 25% off PM for details
http://mybuskins.com/#jhunter
Contact me for more information:
I am a Certified Nutritionist in Optimal Health, Wellness, and Sports.
Contact me for more information:
getfitandhealthy21@yahoo.com
Facebook: https://www.facebook.com/jill.bruschihunter
To order click on link=>
http://www.teambeachbody.com/shop/-/shopping/BCP21D160?referringRepId=499426
Contact me for more information:
getfitandhealthy21@yahoo.com
Facebook: https://www.facebook.com/jill.bruschihunter
To order click on link=>
http://www.teambeachbody.com/shop/-/shopping/BCP21D160?referringRepId=499426
Thursday, March 31, 2016
Tips To Make Grocery Shopping a Easy
1. Do your homework before you ever leave home.
Plan your meals before the trip, and make a grocery list of the items you don’t have on hand. Check out the grocery store circulars and online coupons when planning to take advantage of the week’s best deals. Once you know what you need, list the foods according to type and your store’s layout. For example, most stores have a large produce section, so top your list with the fruits and vegetables you need, then head to the produce area first. Usually, the deli is situated next to the produce aisle, so organize the rest of your shopping list by deli items, fresh seafood and meat, dairy, etc. When health is your top priority, going to the produce aisle first sets the stage for you to fill your cart with fruits and vegetables.
Conversely, you can also decide to shop the middle aisles first for heavier, sturdier staples, and then top off your shopping cart with fresh produce. Using this strategy, you’re forced to be strategic with perishable purchases which, if you are, will save you money and food waste in the long run.
2. Button down your budget.
Purchasing healthy food doesn’t need to break your bank. Here are a few things you can do to not overspend:
•Resist the urge to fill up your cart. Shopping carts have gotten larger in an effort to encourage people to buy more. Stick with your list and buy just what you need.
•Check out the store’s circulars or websites to find the best deals of the week especially on produce, lean meats, wine and healthier, shelf-stable options. Just make sure what is advertised is a sale and not simply an advertisement.
•Go for store-brands versus name-brand items to shave off costs.
•Look for in-season produce whenever possible to get the best price at peak freshness.
•Browse the bulk bins of nuts, trail mixes, grains, and spices. These items are often less expensive option when purchased in bulk and you can buy exactly the amount you need. This is also a good time to buy a small amount of a new item you have been wanting to try.
•Keep your eye on the unit price (think: price per ounce or price per pound) so you can easily figure out the best value.
•Look high and low! The best deals are often located on the top and bottom shelves. The most expensive items are usually on the middle shelves, which are at eye-level and easy to grab.
3. Read labels and ingredient lists.
This is especially important when selecting packaged and processed items, which can contain excess calories, sugar, fat, artificial ingredients, and sodium. Be aware of buzzwords and marketing gimmicks used to reel in buyers. Just because a snack food is labeled as organic, gluten-free, non GMO or healthy doesn’t always mean it is a better option.
4. Strategize against impulse buys.
Sure, you’ve heard that you shouldn’t grocery shop on an empty stomach, and that saying certainly holds true. Going to the store with a full stomach helps to avoid impulse purchases that you might not make if it weren’t for your rumbling tummy. Grocery shop with a list and make a goal to stick to it avoiding aisles you don’t need to go down that may carry tempting and less-than-stellar food choices. Choose a self checkout lane or flip through a magazine when waiting to pay versus standing in line making googly eyes with the candy bars just begging to go home with you. And if you know temptation in the store is going to be too much to handle, add a “Don’t Buy” column on your grocery list as a gentle reminder.
5. Do a gut (and shopping cart) check.
Take a moment before checking out to ask yourself, “Does my grocery cart reflect the way I want my meals to look?” The Dietary Guidelines for Americans recommends a healthy eating pattern dominated by fresh fruits and vegetables, whole grains, lean meats, low-fat dairy, and healthy sources of fat (think: nuts, seeds and oils), while limiting foods high in sugar, salt and trans fat. Does your cart look like that? If it is devoid of colorful produce and heavy on soda and snack foods, you may want to rethink your purchases or take a quick lap around the store to balance what’s missing. You can always put back items you don’t want
Benefits of Drinking Lemon Water
1. Lemon water helps your liver.
2. It allows you to efficiently digest your food....
3. It gives your body an added dose of Vitamin C.
4. Lemon water in the morning gets you energized, minus the caffeine crash.
5. Want clearer, brighter skin? Lemon water can help.
Wake up with water
Before you put coffee, tea, or food into your body, it's best to first break your fast with a glass of water with lemon. When you sleep, your body isn't just abstaining from food but from water, too. Because many vitamins are water-soluble, having a glass before you eat will help your body better absorb nutrients from food.The acidity of the lemon helps rebalance your digestive tract by making it alkaline, allowing "good" bacteria in your intestines to thrive and facilitate optimal nutrient absorption
You know you're supposed to have multiple glasses a day. But it's better to sip a little water all day long instead of chugging a giant glass when you suddenly feel parched.
Fluffy Greek Yogurt Pancakes
Ingredients:
- 2 cup whole-wheat flour or almond flour
- 4 teaspoons baking powder
- 1 Tablespoon sugar
- 1/2 teaspoon salt
- 1 1/2 cups unsweetened almond milk (or any other variety of milk)
- 2 large eggs
- 2 teaspoons vanilla extract
- 1/2 cup plain lowfat Greek yogurt
- Natural Maple syrup, for serving
- Fruit, for serving
Directions:
- In a large bowl, whisk together the whole-wheat flour, all-purpose flour, baking powder, sugar and salt.
- In a small bowl, whisk together the milk, eggs and vanilla extract. Pour the liquid mixture into the flour mixture and stir just until combined. Add the yogurt and stir.
- Head a 12-inch nonstick skillet or griddle over medium heat and spray it well with nonstick cooking spray. Working in batches, spoon a quarter cup of the batter onto the pan for each pancake and cook just until bubbles form around the edges of each pancake, about 3 minutes. Flip and cook for 90 seconds more. Transfer the pancakes to a warm plate. Repeat with the remaining batter.
- Serve the pancakes topped with maple syrup and fruit.
Beef Enchilada Zucchini Boats
Ingredients:
- 1 Tbsp avocado/olive oil
- ½ cup diced onion
- 1 lb. lean ground beef (grass fed if possible)
- 2 garlic cloves, minced
- 1/2 tsp smoked paprika
- 1 tsp cumin
- Sea salt to taste
- 3 medium-large zucchini, sliced in half lengthwise and scooped out to create a “boat”
- 1/2 cup red enchilada sauce (read labels…look for minimal ingredients)
- 1/4 cup shredded cheddar cheese (optional)
- 1/4 cup fresh cilantro leaves
- optional toppings:
- diced tomatoes
- diced green onions
- diced avocado
- Instructions:
- Preheat oven to 375 degrees.
- Heat a medium large skillet to medium high heat.
- Add oil and onions to the pan. Saute until translucent or soft, about 2-3 minutes.
- Add the ground beef. Cook until there is no more pink in the meat, breaking up meat into small pieces.
- Add garlic, smoked paprika, cumin, and salt to taste. Stir to combine.
- In a 13×9 inch baking dish, lay zucchini boats flesh side facing up. Scoop the ground beef mixture into the “boat” part of the zucchini.
- Pour the red enchilada sauce over the filled zucchini boats.
- Sprinkle with cheese. (Optional)
- Cover the baking dish with tin foil. Bake for 20-22 minutes in preheated oven.
- Remove foil from the pan. Bake for another 5 minutes uncovered.
- Garnish with fresh toppings, and serve.
- optional toppings:
Wednesday, March 30, 2016
Turkey Meatloaf Balls
Ingredients
- 1 lb of Lean Ground Turkey
- 1 egg
- 1/2 cup old fashioned rolled (quick) oats
- 2 tsp Worcestershire sauce
- 1/2 cup shredded carrots
- 1/2 cup broccoli, chopped (thaw out if frozen)
- 3 cloves garlic, minced
- 1/3 cup onion, minced
- 1/2 tsp paprika
- 1/2 tsp dried parsley
- 1/2 tsp dry mustard
- 1/2 tsp black pepper
- 1/4 tsp sea salt
- 12 Small Cubes of Mozzarella Cheese
sauce
- 1 tbsp raw honey
- 1/2 cup tomato sauce
- 2 tsp Worchestershire sauce, or to taste
Directions:
- Preheat oven to 450.
- Spray a muffin tin with olive oil or use silicone muffin cups to avoid the oil
- Run broccoli, onion, carrots and garlic through a food processor until finely chopped.
- Mix ground turkey, egg, oats, vegetable mix from food processor and the remainder of ingredients (except cheese) in a large bowl.
- In a separate bowl whisk together the ingredients for the sauce and set aside.
- Separate 1/4 cup of meat and add a mozzarella piece to the center.
- Roll into a ball and put in the muffin tin.
- Top with sauce.
- Bake muffins for 20 minutes.
- Remove from oven and let sit for 5 minutes.
- Enjoy!
What's a Habit?
A habit is something that a person does often in a regular and repeated way.
bad" versus "good" It's important to recognize that habits are really a learning mechanism for your mind.When an action makes us feel good, our brain forms a shorthand connection so when we're in a similar context or situation in the future, the response that’s been rewarded automatically comes to mind.
Because habits are all about context, the environment leading up to the behavior turns into what psychologists call "cues" or "triggers." These cues send a signal that says, "Hey, this is the same situation—let's do the same thing and feel good again." You have a zit, you pick at it. You finish lunch, you want something sweet. You're bored in line? You check Facebook or Emails.
The problem? Willpower (to not do the bad thing) pales in comparison to the sway these cues hold. Ideally, you'd remove yourself from the triggers that set it off. But old habits die hard, so the key is to form a new good habit to keep yourself from repeating the bad one. And if you can't actually remove yourself from the situation, it can help to create roadblocks to keep yourself from the mindless go-to—turn your phone on airplane mode to avoid scrolling or call a friend instead of reaching for the candy dish on the desk.
How do you create a replacement habit? First, keep it simple. The more steps you have to complete before a reward, the harder a habit is to learn. M&MS to mouth: yum, learned. That's why your replacement habit should be easy and make you feel as good as the original did—otherwise you could backslide, Wood says.
And most importantly, it should be accessible, so you can turn to it whenever the urge for the original pops up, (although that's usually the end of the day, when our willpower is scientifically proven to be weakest).
In other words, if you're trying to avoid snacking as soon as you get home, don't make yourself finish a Sudoku—call a friend instead. Unless, that is, Sudoku gives you the same emotional calm as diving into the snack cabinet, the end goal for these replacement habits.
The good news: Forming a new habit can happen in as few as 18 days, although the time frame depends on how many steps the behavior is, how good the reward feels, and how much discipline someone has.
Here are three other quick tips for kicking a habit:
1. Change things up.
Altering your environment can be immensely helpful while you're in the process of creating a new habit, even if it's just moving the chips to the back of the cupboard.2. Take your time.
Give yourself a realistic time line for cutting back on the bad habit. Go two days without skin picking, give yourself a day off, and try three days next time.3. Tell a friend.
It may sound corny to share your #goals with friends and family who can amp you up about getting there, the added feelings of congratulations and validation can be a powerful force to keep you on track.And if you backslide into the bad habit? It happens. Embrace it, look at the situation, figure out what triggered you back into your old ways, and make a note to learn from it in the future. Remember: Rather than beat yourself up when you're already down, it's all about moving forward.
The Takeaway
Our brain forms habits for the not-small task of keeping us alive and learning new things, and while it's tough, breaking a bad one is doable. Context cues play a major role, so forming a new habit is the best method to change your ways—keep it simple and aim to please (yourself), and the bad habit will eventually fade away.Oven-Fried Chicken Strips
Ingredients
- 2 pounds (16 ounces) boneless, skinless chicken breast, cut into pieces
- 1 cup dried bread crumbs or corn flakes bread crumbs
- 1 teaspoon garlic powder
- 1 teaspoon salt
- 1 teaspoon ground black pepper
- 1 teaspoon dried thyme
- 1/2 teaspoon paprika
- 1/4 cup low fat mayonnaise or Greek yogurt
- ¼ cup reduced-fat milk or fat free buttermilk
Preheat oven to 375°F.
In a medium bowl or gallon-size resealable plastic bag, mix together the bread crumbs, garlic powder, salt, pepper, thyme and paprika.
Coat the chicken pieces with mayonnaise. Place chicken pieces in bowl/bag with bread crumb mixture and coat/shake until well coated. Place chicken pieces in a lightly greased 9-inch-by-13-inch baking dish, and bake until opaque, approximately 20-25 minutes depending on thickness of strips.
Quick and Crispy Vegetable Fritters
Ingredients:
- 2 cups shredded zucchini
- 2 cups shredded carrots
- 2 cloves garlic, minced
- 2/3 cup all-purpose flour
- 2 large eggs, lightly beaten
- 1/3 cup sliced scallions (green and white parts)
- Vegetable oil
- Sour cream or yogurt, for serving
Directions:
- Place the shredded zucchini in a colander and sprinkle it lightly with salt. Let the zucchini sit for 10 minutes then using your hands, squeeze out as much liquid as possible.
- Transfer the zucchini to a large bowl then add the carrots, garlic, flour, eggs, scallions, 1/4 teaspoon salt and 1/8 teaspoon pepper. Stir the mixture until it is combined.
- Line a plate with paper towels. Place a large sauté pan over medium-high heat and liberally coat the bottom with vegetable oil. Once the oil is shimmering, scoop 3-tablespoon mounds of the vegetable mixture into the pan, flattening the mounds slightly and spacing them at least 1 inch apart.
- Cook the fritters for 2 to 3 minutes then flip them once and continue cooking them an additional 1 to 2 minutes until they’re golden brown and crispy. Transfer the fritters to the paper towel-lined plate, season them with salt and repeat the cooking process with the remaining mixture.
- Serve the fritters immediately topped with sour cream or yogurt
maple dijon chicken
Ingredients
- 1lb boneless skinless chicken breast (4 breasts)
- 1/4 cup Dijon mustard
- 1/4 cup nonfat Greek yogurt
- 1-2 Tbsp balsamic (to taste)
- 2-3 Tbsp maple syrup (or sub some/all with a low/no sugar substitute or your favorite liquid sweetener)
- salt & pep
- fresh rosemary for garnish (optional)
Procedure
- 1Preheat oven to 425ºF.
- 2Combine all ingredients except for chicken/rosemary, seasoning to taste.
- 3Coat chicken in the mixture and transfer to a glass baking dish. Use any extra sauce on top of the chicken.
- 4Bake for 30-35 minutes until cooked through, to your preference (at least 165º for safe eating).
- 5Serve with fresh rosemary as a garnish.
blueberry yogurt cookies
Ingredients
- 1 cup oat flour (blend up oats)
- 3/4 cup greek yogurt
- 2 Tbsp egg whites
- 1/2 tsp vanilla
- 1/3 cup granulated stevia (not extract), or granulated sweetener of choice
- 1 tsp baking powder
- 1/2 tsp salt
- 3/4 cup blueberries
Procedure
- 1Preheat oven to 375ºF.
- 2Combine wet and dry ingredients separately.
- 3Mix dry ingredients into wet ingredients. Stir in blueberries.
- 4Drop Tablespoons of batter onto a baking sheet lined with foil and sprayed.
- 5Bake for 8-10 minutes.
Simple Ways to Stick to Eating Healthy
Eating healthy can help you lose weight and have more energy. It can also improve your mood and reduce your risk of disease. Yet despite all these benefits, maintaining a healthy diet and lifestyle can be difficult.
1. Start with Realistic Expectations
Eating a nutritious diet has many benefits, including potential weight loss.
However, it’s important to set realistic expectations.
For example, if you pressure yourself to lose weight too quickly, your plan to achieve better health may backfire.
Researchers found that obese people who expected to lose a lot of weight were more likely to drop out of a weight loss program within 6–12 months (1).
On the other hand, setting a more realistic and achievable goal can keep you from getting discouraged and may even lead to greater weight loss.
Bottom Line: Having realistic expectations increases your chances of maintaining healthy lifestyle behaviors.
2. Think About What Really Motivates You
Remembering why you’re making healthy choices can help you stay on course.
It can be helpful to make a list of the specific reasons why you want to get healthier.
Keep this list handy and refer to it when you feel you need a reminder.
Bottom Line: When you’re tempted to indulge in unhealthy behaviors, remembering what motivates you can help you stay on track.
3. Keep Unhealthy Foods out of the House
It’s really tough to eat healthy if you’re always surrounded by junk foods.
If other family members want to keep these foods around, at least keep them hidden, rather than on counter tops.
The saying “out of sight, out of mind” definitely applies here.
Having food on display in various areas of the house has been linked to obesity and an increased consumption of unhealthy foods.
Bottom Line: Keeping unhealthy foods out of the house or at least out of sight, can increase your chances of staying on track.
4. Don’t Have an “All or Nothing” Approach
A major roadblock to achieving a healthy diet and lifestyle is “black and white” thinking.
One common scenario is that you have a few unhealthy appetizers at a party and decide that your diet is ruined for the day and proceed to overindulge in unhealthy foods.
Instead of considering the day “ruined,” try putting the past behind you and choosing healthy, unprocessed foods that contain protein for the remainder of the party.
This will help you feel full and satisfied, rather than stuffed and frustrated.
A few off-plan choices make very little difference in the long run, as long as you balance them with healthy foods.
Bottom Line: Rejecting the urge to judge your day as “good” or “bad” can prevent you from overeating and making poor choices.
5. Carry Healthy Snacks
Sticking to a healthy diet can be tough when you’re away from home for extended periods of time.
Unfortunately, when you get too hungry, you may end up grabbing whatever is available.
This is is often processed food, which doesn’t really satisfy hunger and isn’t good for you in the long run.
Having healthy high-protein snacks on hand can help keep your appetite in check until you’re able to have a full meal.
Some examples of good, portable snacks are almonds, peanuts and jerky. Also consider filling a small cooler with hard-boiled eggs, cheese or Greek yogurt.
Bottom Line: Take healthy high-protein snacks when you’re on the road or travelling in case you’re unable to eat a meal for several hours.
6. Change Diet and Exercise at the Same Time
You may have heard you shouldn’t change too many things at once when trying to improve your health. In general, this is good advice.
However, research has shown that when you make both dietary and physical activity changes at the same time, the results tend to reinforce each other.
Bottom Line: Simultaneously changing the way you eat and exercise increases your chances of healthy lifestyle success.
7. Have a Game Plan Before Eating Out
Trying to maintain a healthy diet while eating out can be very challenging.
Fortunately, there are ways to make it easier.
It’s best to have a strategy in place before you get to the restaurant, rather than being overwhelmed once you get there.
Bottom Line: Having a plan before eating out can help you make healthier food choices.
8. Don’t Let Traveling Derail You
Whether you’re traveling for business or pleasure, being outside of familiar territory can make it difficult to stick to a healthy lifestyle. Here are a few tips:
•Research the restaurants and supermarkets ahead of time.
•Pack some healthy foods that don’t spoil easily.
•Challenge yourself to stay on track for most of the trip.
Bottom Line: You can stick to a healthy eating plan while traveling. All it takes is a bit of research, planning and commitment.
9. Practice Mindful Eating
Eating mindfully can help you maintain a healthy lifestyle.
Take time to enjoy your food and appreciate its ability to nourish you. This increases your chances of making successful, lasting behavioral changes.
Bottom Line: Adopting a mindful eating approach can help you achieve a better relationship with food and may also reduce binge eating.
10. Track and Monitor Your Progress
Logging the foods you eat into a diary, online food tracker or app can help you stick to a healthy diet and lose weight.
Measuring your exercise progress is also beneficial and provides you with motivation that can help you keep going.
Bottom Line: Tracking your food intake and exercise can provide motivation and accountability. Studies show that it helps you stick to a healthy diet and leads to greater weight loss.
11. Get a Partner to Join You
Sticking with a healthy eating and exercise plan can be tough to do on your own.
Having a diet or exercise buddy may be helpful, especially if that person is your partner or spouse .
Bottom Line: Having a partner join you in making healthy lifestyle changes can increase your chances of success.
12. Start the Day with a High-Protein Breakfast
If your first meal is well balanced and contains adequate protein, you’re more likely to maintain stable blood sugar levels and not overeat for the rest of the day.
Bottom Line: Eating a high-protein breakfast helps you stay full and can prevent overeating later in the day.
13. Realize It Takes Time to Change Your Habits
Don’t be discouraged if it takes longer than you expect to adapt to your new healthy way of living.
Eventually, eating healthfully and exercising regularly will become automatic.
Bottom Line: Do your best to stay motivated and focused while you adapt to a healthy lifestyle. It takes 66 days to make a new habit, on average.
14. Figure Out What Works Best for You
There is no perfect way of eating that works for everyone.
It’s important that you find a way of eating and exercising that you enjoy, find sustainable and can stick to for the rest of your life.
The best diet for you is the one you can stick to in the long run
They said she had 'The Perfect Body'. Then this photo caused a worldwide uproar... (Via Taryn Brumfitt at http://omele.to/1q58szw)
Tuesday, March 29, 2016
Balsamic Chicken with Green Beans
Ingredients
- 1 pound green beans, trimmed and rinsed
- 2 teaspoons olive oil, divided
- 1 pound button mushrooms, sliced
- 4 cloves garlic, thinly sliced
- 1 lemon, zested and juiced
- 1 yellow onion, cut into 1/4-inch thick rings
- 1 pound boneless, skinless chicken breast, sliced 1/2-inch thick
- 2 tablespoons balsamic vinegar
- 2 teaspoons dried thyme
- 1/2 teaspoon sea salt
Fill a large pot halfway with water and bring to a boil. Prepare an ice bath nearby. Add beans to pot and reduce heat to medium-high. Cook until tender-crisp, about 5 minutes. Drain and plunge into ice bath; drain again and set aside.
In a large nonstick skillet, heat 1 teaspoon oil on medium heat. Add mushrooms and sauté, stirring occasionally, for 8 to 10 minutes. Stir in garlic, lemon zest and juice and sauté for 1 minute. Stir in beans and heat through. Remove from heat and cover to keep warm.
Meanwhile, in a separate large nonstick skillet, heat remaining 1 teaspoon oil on medium. Add onion and sauté for 5 minutes. Add chicken, vinegar, thyme and salt and cook, stirring often, for 8 minutes, until chicken is cooked through. Remove from heat. Divide chicken and bean mixtures among plates and drizzle chicken with pan juices.
Buskins Leggings
Love my leggings. FREE Shipping!
Don't forget to ask me about the "Get Paid to Wear Leggings Deal" (PM for details)
=>Click on my below link to order a pair of leggings.
http://mybuskins.com/#jhunter
Monday, March 28, 2016
Chicken & Spinach Orzo
Ingredients
- 2 teaspoons olive oil
- 1 large onion, halved and sliced
- 1/4 cup chicken broth
- 3 tablespoons currants or raisins (optional)
- 1 1/2 cups cooked chicken breast
- 8 cups packed spinach, torn into pieces
- 1/4 teaspoon salt
- 8 ounces uncooked orzo
- 1/4 cup toasted pine nuts or slivered almonds (optional)
- 1/4 cup shaved fresh Parmesan cheese
Heat oil in a large nonstick skillet over medium heat. Add onion; cook, stirring occasionally, 15 minutes or until onions are golden brown.
Stir in broth, currants and chicken. Add spinach. Cover with lid and cook for 3 minutes, tossing occasionally with tongs until spinach wilts. Stir in salt.
Cook orzo in boiling water for 8 minutes or until tender; drain. Toss together drained orzo and spinach mixture. Sprinkle with nuts and cheese. Serve immediately.
Thursday, March 24, 2016
Monday, March 21, 2016
Chocolate Chip Cookies
1 tsp baking soda
1/4 tsp Himalayan salt
1/4 cup of coconut oil melted
1/4 cup pure maple syrup or honey
1 large egg
2 large egg white (1/4 cup)
1 tsp pure vanilla extract
1 tsp natural peanut butter (optional)
2 dark chocolate chips in each cookie
combine flour, baking soda, and salt in a bowl, mix and set aside.
beat oil and maple syrup in large bowl until creamy about 4-5 minutes.
add egg, egg whites, and extract and PB beat for 2 minutes.
add flour mixture to the egg mixture until blended.
drop tbsp. onto prepared baking sheet. add 2 dark chocolate chip to each cookie.
flatten cookie with spatula
bake 375 for 8-12 minutes.
Sunday, March 20, 2016
Chop Chop Fresh Veggie Salad
Ingredients:
- 1 (15 oz) can chickpeas, drained & rinsed
- 1/4 red onion, slivered
- 1 yellow bell pepper, seeded & chopped
- 1 orange bell pepper, seeded & chopped
- 1 green bell pepper, seeded & chopped
- 2 cups grape tomatoes, sliced
- 2-4 small English cucumbers, chopped
- 4 stalks celery, sliced
- 1/3 cup kalamata olives,
- sliced 4 oz feta cheese, cubed
- 1/4 cup extra virgin olive oil
- juice of 2 fresh lemons
- 2 cloves garlic, minced
- 2 Tbsp. fresh parsley leaves, chopped
- sea salt & pepper to taste
Thursday, March 17, 2016
Chicken and Green Bean Stir-Fry
Ingredients
- 1 pound boneless, skinless chicken breasts - cubed
- ½ teaspoon salt
- ¼ teaspoon pepper
- 4 cups green beans - trimmed and cut in 1 in. pieces
- ¼ cup chicken broth - low sodium
- 2 tablespoons hoisin sauce
- 2 tablespoons soy sauce - low sodium
- 2 tablespoons rice vinegar
- 2 tablespoons minced ginger
- 2 teaspoons sesame oil
- 1 garlic clove - minced
- 1 teaspoon chili paste
- scallions and brown rice - to serve (optional)
Instructions
- Pre-heat a wok or deep frying pan over high heat and spray with cooking spray.
- Sprinkle chicken cubes with salt and pepper and stir-fry until brown, about 7-9 minutes, stirring frequently. Remove chicken from wok and set aside.
- Add green beans to the pan and toss until they start to soften, about 2-3 minutes.
- In a small bowl, whisk together all remaining ingredients: chicken broth through chili paste. Pour mixture into the wok and bring to a boil then reduce to simmer. Stir-fry until green beans are tender.
- Add chicken back to the wok and toss until heated through.
- Sprinkle with scallions and serve over brown rice if you wish
Wednesday, March 16, 2016
Pot Roast with Potatoes and Carrots
Ingredients
2 Tbsp olive oil
Salt and freshly ground black pepper
1 large yellow onion, coarsely chopped
3 cloves garlic, minced
1 (14.5 oz) can beef broth
3/4 cup dry red wine (optional)
2 sprigs fresh thyme
2 sprigs fresh rosemary
1 bay leaf
2 lbs yukon gold potatoes, cleaned then diced into 1 1/2 inch pieces
6 medium carrots, peeled and chopped into 1 1/2-inch pieces
.
Directions
Preheat oven to 275 degrees. Heat olive oil in a large dutch oven over medium-high heat. Season roast all over with salt and pepper, then add roast to pot and brown on all sides, about 2 minutes per side. Remove roast to cutting board (or plate), add onions to pan and saute until they begin to brown, about 4 – 5 minutes, adding in garlic during last minute. Return roast to pan, pour beef broth and optional red wine over roast. Add thyme, rosemary and bay leaf to broth. Bring to a simmer, then cover pot with lid and transfer to oven and cook 2 hours.
Remove from oven, add carrots and potatoes to pot and season with salt and pepper. Return to oven and cook 1 – 1 1/2 hours longer until roast and veggies are tender. Remove roast and shred or cut into large pieces, while removing fat, then return to pot. Remove bay leaf and herb sprigs. Serve warm.
Lemon Garlic Chicken

Ingredients
- 4 boneless, skinless chicken breasts
- 1 cup chicken broth
- 1/3 cup heavy cream
- 1/4 cup red onion, finely chopped
- 3-4 cloves garlic, minced
- 3 tablespoons lemon juice
- 2 tablespoons unsalted butter
- 2 tablespoons basil, finely chopped
- 2 tablespoons olive oil
- 1/2 teaspoon red pepper flakes
- kosher salt and freshly ground pepper, to tast
- lemon slices, garnish
Preparation
- Preheat oven to 375º F and pound chicken breasts out to 1/2-inch thickness. Season both sides generously with salt and pepper.
- Heat olive oil in a large, oven-proof skillet and brown chicken breasts over medium-high heat for 2-3 minutes per side.
- Transfer chicken to a separate plate and sauté red onion in remaining juices until softened, 6-8 minutes. Season with salt and pepper.
- Add garlic and sauté for 1 minute, or until fragrant, then pour in chicken broth, lemon juice and red pepper flakes.
- Reduce heat to medium and cook, stirring occasionally, for 8-10 minutes, or until thickened. Make sure to scrape up browned bits from the bottom of skillet.
- Remove skillet from heat and whisk in heavy cream. Return to low heat and cook for 30 seconds, then remove from heat again.
- Return chicken to pan and cover it in sauce.
- Place skillet in oven and cook for 5-7 minutes, or until chicken is cooked through completely.
- Remove from oven and top with fresh basil and lemon. Serve warm and enjoy!
Fiesta Sweet Potato Hash
Ingredients
- 3 medium sweet potatoes
- 1 Tbsp avocado oil
- Sea salt and freshly ground black pepper to taste
- 1/2 tsp garlic powder, or 1 tsp freshly minced garlic
- 1 tsp ground cumin
- 6 fresh eggs
- 1/4 cup chopped fresh cilantro leaves
- 1/2 cup sliced grape tomatoes
- 1 ripe avocado, diced
Instructions
- I used 3 medium sweet potatoes, diced into even 1 inch cubes.
- Heat a splash (about 1 Tbsp) of avocado oil in a large skillet on medium/high heat.
- Toss the potatoes in the hot oil for about 20 minutes until cooked through & a little crispy. Season with sea salt and pepper to taste. Sprinkle with garlic powder, and cumin. Toss to coat potatoes well.
- Carefully break eggs on top of the potatoes.
- Lower heat to medium/low.
- Cover pan & cook eggs to your desired doneness. Mine took about 6-7 minutes.
- Sprinkle with fresh cilantro, chopped avocado, and sliced grape tomatoes.
Monday, March 14, 2016
The Most Effective Core Moves to Do at the Gym
1. Hanging Leg Circles
Grip a pull-up bar with palms parallel, arms extended. (The bar should be high enough to hang from with legs extended, without feet touching the ground.) Engaging core and keeping legs straight, draw a big circle in the air with feet. Be sure to brace your abs tight so your body doesn't swing back and forth. Reverse the circle. One circle in each direction equals 1 rep. Do 8 to 10 reps.
Make it easier: Work up to the pull-up bar by doing the move in a captain's chair first, which will provide more stability.
2. Hanging Bicycles
This one may look like you're running in the air, but hey, it works. Grip a pull-up bar with palms parallel, arms extended. Engage core and pull knees up to a 90-degree angle, thighs parallel to the ground. From here, pedal your flexed feet as if riding a bicycle. Repeat as quickly as possible while maintaining control for 30 seconds.
3. Hanging Side-to-Side Knees
Grip a pull-up bar. Engage core and lift knees toward the right side of torso, allowing legs to bend naturally. Pull knees as close to right side of chest as possible, then slowly lower back to starting position. Repeat by pulling knees to left side of chest. Completing both the right and left sides counts as 1 rep. Do 8 to 10 reps.
Make it easier: Draw both legs straight up to the center of chest.
Cable Machine
4. Cable Isometric Hold
Don't let the cable machine intimidate you—it's easier to use than you think. Stack on a light weight (start with 10 pounds or fewer) and position the carriage so it's even with chest. Stand next to machine, left side facing away from machine. Hold one cable handle with both hands, then take one big step away from the machine. Extend both arms fully at chest-height, come into a comfortable half-squat, and hold the weight steady. Engage abs to hold the handle straight in front of body—don't twist body toward the machine. Aim for perfect posture. Hold for 30 seconds, then switch sides.
5. Cable Oblique Crunch
Stack a medium weight onto the cable machine and slide the carriage down to setting close to the ground. Standing with your right side perpendicular to the machine, take hold of the cable handle with your right hand. Place left hand behind head. Engage obliques and lean to the left, away from the machine, performing a standing side crunch. Return to starting position. Do 10 to 15 reps, then repeat on the other side.
6. Side Plank With Cable Hold
As long as you've mastered a bodyweight side plank, you're good to go on this one. Load a light weight onto the cable machine, slide the carriage down to a low setting, and position yourself a few feet from the machine. Take cable handle in left hand and come into a side plank on right forearm, bracing core and stacking feet. Extend left arm so body forms a T shape. Hold for 30 seconds, then repeat on the other side.
7. Overhead Kneeling Cable Hold
Load a light weight onto the cable machine and slide the carriage down to a low setting close to the floor. Start with right side of your body facing the machine, right foot and left knee on the floor. Hold the cable handle in both hands and pull the handle overhead, using hands to hold the cable in place on top of head. The goal is to stay perfectly straight (don't lean toward the machine), with core engaged. Hold for 30 seconds, then repeat on the other side (with left side closer to machine).
Bosu Ball
8. Mountain Climbers
Place the Bosu ball bubble side down. Start in a plank position, gripping the edges of the flat side of the ball. Bring right knee in toward left elbow, then left knee in toward right elbow (like mountain climbers). Repeat, running legs to opposite elbows as quickly as possible for 30 seconds.
Make it easier: Run legs straight in toward chest, instead of to opposite elbows.
9. C-Sit
Place the Bosu ball flat side down. Sit on the center of the bubble side, knees together and bent, core engaged, back straight, and feet on the ground. Once you have your balance, slowly lift feet off the ground and lean back slightly to keep balanced. Raise arms straight at your sides so body forms a V shape. Hold for 30 seconds.
10. Side Crunch
Place the Bosu ball flat side down. Rest right hip on ball, legs extended straight. Place hands behind head with bent elbows. (Place right hand on ground if you need more support.) Crunch up to the left, engaging obliques and using your whole core to help stabilize. Think about bringing left elbow to left hip in order to engage obliques. Do 10 to 12 reps, then repeat on other side.
Welcome to Get Fit and Healthy. We start on March 28th until April 11th. I will help you get started on your new health journey with recipes, how much food, water, and workouts. Dont worry there is NOTHING TO BUY !
Click on the below link to join and add your friends too
https://www.facebook.com/groups/healthyandfit4free/
Friday, March 11, 2016
Butternut Squash Fritters
Ingredients:
- 5 cups shredded butternut squash, lightly packed (See Kelly’s Note)
- 2/3 cup all-purpose flour
- 2 large eggs, lightly beaten
- 1 1/2 Tablespoons minced fresh sage
- Olive oil
Directions:
- In a large bowl, combine the shredded butternut squash, flour, eggs, minced sage, 1/4 teaspoon salt and 1/8 teaspoon pepper to the bowl, stirring until the mixture is combined. Line a plate with paper towels.
- Liberally coat the bottom of a large sauté pan with vegetable oil and place it over medium-high heat. Once the oil is hot, scoop 3-tablespoon mounds of the mixture into the pan, pressing them lightly into rounds and spacing them at least 2 inches apart. Cook the fritters for 2 to 3 minutes, then flip them once and cook an additional 2 minutes until golden brown and cooked throughout. Transfer the fritters to the paper towel-lined plate and immediately sprinkle them with salt. Repeat the scooping and cooking process with the remaining mixture.
Mini Eggplant Pizza Bites
Ingredients
- 1 large, or 2 medium eggplants, sliced into ¼ inch rounds (keep the skins on)
- Sea salt
- Minced garlic, or garlic powder (optional)
- 1 cup high quality, no-sugar addded marinara
- 1/3 cup organic, shredded mozzarella cheese
- 1/4 cup shredded fresh basil leaves
- Freshly ground black pepper, to taste
Instructions
- Preheat oven to 425 degrees.
- Line two large baking sheets with parchment paper, or spray with avocado oil.
- Arrange eggplant slices on the baking sheets.
- Season eggplant with salt, and garlic (if using).
- Spoon marinara sauce in the center of each eggplant slice.
- Sprinkle cheese evenly, on top of the marinara sauce.
- Bake the eggplant pizzas for about 20 minutes.
- Remove from the oven and scatter the shredded basil on top.
- Season with pepper to taste.
- Serve immediately.
Thursday, March 10, 2016
Jambalaya
Ingredients
- olive oil - 1 tsp
- Cajun seasoning - to taste
- boneless, skinless chicken breasts - 8 oz raw, cut into 1 in. cubes
- lean turkey sausage - 8 oz, cut into 1 in. cubes
- onion - 1 c, diced
- celery - 2 ribs, diced
- green bell pepper - 1, diced
- yellow bell pepper - 1, diced
- zucchini - 1 medium, diced
- garlic - 4-5 cloves
- brown rice - 3/4 c
- no salt added tomatoes - 1 15-oz can
- low-sodium, fat-free chicken broth - 1 c
- Worcestershire sauce - 2 tsp
- cumin - 1 tsp
- thyme - 1 tsp
- cayenne pepper - 1/2 tsp
- black pepper - 1 tsp
- shrimp - 8 oz, peeled
- parsley - 2 tbs, optional
- green onions - 2 tbs, optional
Instructions
Heat oil in a large skillet over medium high heat.
Toss chicken cubes with Cajun seasoning and saute, stirring occasionally, until brown, about 5-6 minutes. Remove to a plate.
Saute sausage until brown, about 6-8 minutes and remove to a plate.
Reduce heat to medium and add onion, peppers, and celery to the pan. Saute for about 5 minutes and add zucchini. Continue cooking, stirring, until onion is translucent.
Add garlic and rice. Saute until rice is opaque and begins to brown.
Add tomatoes, broth, Worcestershire sauce, and spices. Bring to a boil, reduce to simmer, cover and cook until rice is tender, about 30-40 minutes depending on the type of rice.
Uncover and add shrimp. Cook until shrimp are opaque and any excess liquid has boiled out.
Stir in parsley and green onions. Serve.
Kettlebell Exercises
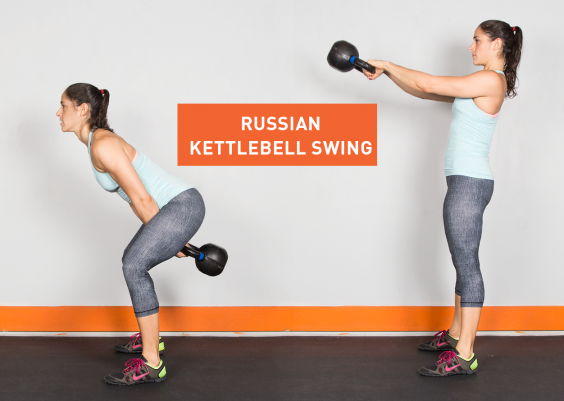
1. Russian Kettlebell Swing
Targets: Shoulders, back, hips, glutes, legsLevel: Beginner
How to: To do the perfect kettlebell swing, stand up straight, with feet a bit wider than hip-distance apart. Grab the handle with both hands, keeping the palms face down and arms in front of the body. Maintain a slight bend to the knee and drive the hips back, lowering the body—but not too low (this isn't a squat!). Then, in a fluid motion, explosively drive the hips forward while swinging the kettlebell, keeping the glutes and core engaged. Remember: The motion should come from the hips, not the arms, as the body returns to standing. Lower the weight back down between the legs and keep this swinging motion going for 12 to 15 reps.

2. Single-Arm Kettlebell Swing
Targets: Shoulders, back, hips, glutes, legsLevel: Beginner-Intermediate
How to: This movement is just like the two-handed swing, but uses one hand at a time. Swing the kettlebell up with one arm, but still swing the other arm to help drive momentum. Alternate hands when the kettlebell is behind the legs; aim for 10 to 12 reps with each arm.
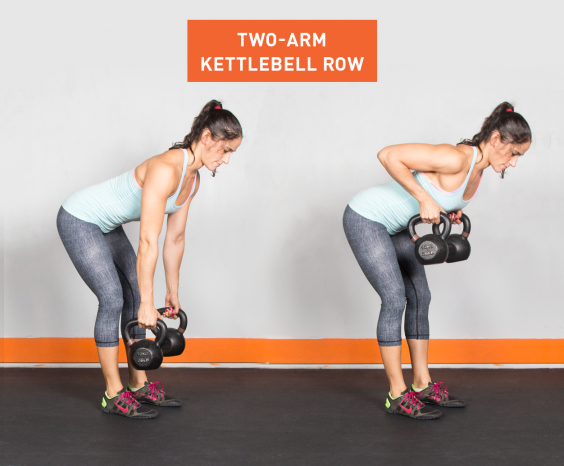
3. Two-Arm Kettlebell Row
Targets: Back, arms, shouldersLevel: Beginner-Intermediate
How to: Grab two kettlebells for this one. (Double the pleasure, double the fun, right?) Place them in front of the feet and bend the knees slightly. Next, bend over to grab both kettlebells and pull them towards the stomach, keeping the elbows close to the body and the back straight. Lower the weights, repeat for 12 to 15 reps max, feel like a champ.

4. Kettlebell Figure-8
Targets: Arms, back, absLevel: Intermediate
How to: Looking to impress a certain someone at the gym? Then try this: Start with legs a bit wider than hip-width distance apart, and lower yourself into a quarter-squat position. (Keep that back straight and chest up!) Grab the kettlebell with the left hand and swing it around the outside of the left leg and then back between the legs. Next, pass the kettlebell to the right hand and swing it around the outside of the right leg. Keep this motion going, similar to the classic basketball drill! Can you do a minute straight? (Be sure to switch directions half-way through!)
5. Kettlebell Goblet Squat
Targets: Legs, glutes, backLevel: Intermediate
How to: What’s a squat without a kettlebell in hand? Stand up straight, holding the kettlebell in front of the chest with both hands, keeping the elbows close to the body. Start squatting by driving the heels into the ground and pushing the hips back until the thighs are parallel to the ground or just below. Return to standing, and repeat for 15-20 reps (or more!) Just remember: quality over quantity!

6. Kettlebell High Pull
Targets: Shoulders, arms, glutes, legsLevel: Intermediate
How to: Turn those toes out 45 degrees with feet a bit wider than shoulder-width apart. Place the kettlebell on the ground between both legs and begin to squat while keeping the core engaged, and grip the kettlebell handle with one hand. Then, using force from the hips, push through the heels to rise to standing, pulling the kettlebell upwards while the elbow drives up. Lower back down and switch arms. Shoot for 10 to 12 for each arm.
7. Kettlebell Lunge Press
Targets: Shoulders, back, arms, abs, glutes, legsLevel: Intermediate
How to: Here’s a new way to spice up those lunges. Stand up straight while holding the kettlebell in front of the chest with two hands, arms bent and palms facing each other. Lunge forward with one leg while raising the kettlebell overhead (raise the roof!). Return to standing while returning the kettlebell to the chest. Try for 10-15 reps on each leg.
8. Kettlebell Sumo High-Pull
Targets: Back, legs, shoulders, armsLevel: Intermediate
How to: We promise no wrestling is involved. Start with the kettlebell between the feet, set a bit wider than hip-distance apart. Grab onto the handle with both hands with the knees bent and hips back. Then, pull the kettlebell to the shoulders while the knees straighten and elbows rise. Remember: The force is coming mostly from the hips, the arms pulling at the very end. Keeping the core engaged the whole time, move the weight back down by the ground and repeat for 12-15 reps.
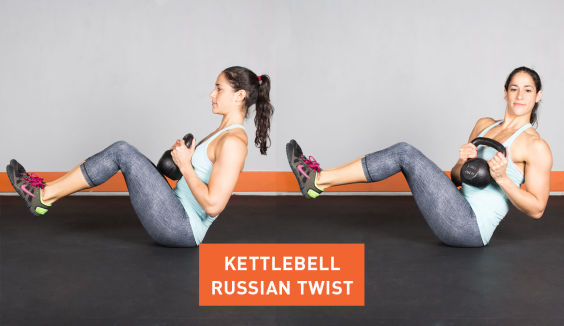
9. Kettlebell Russian Twist
Targets: Abs, obliquesLevel: Intermediate
How to: Forget crunches. Sit with the legs bent and feet flat on the floor, about hip-distance apart. Hold the kettlebell with both hands at the chest, and then lean back to a 45 degree angle. Here’s the fun part: Rotate the torso from left to right by twisting at the waist and swinging the kettlebell across the body. See how many you can do, with perfect form of course!

10. Kettlebell Windmill
Targets: Shoulders, back, abs, obliques, hipsLevel: Advanced
How to: Hold the kettlebell in the right hand and angle the feet 45 degrees away from the right arm. Raise the kettlebell overhead, lock the arm, and keep your eyes on the weight (which will help keep the shoulders aligned!). Shift your weight onto the right leg and begin bending forward at the waist. Keep the right arm extended overhead as the body bends forward and the left arm is pointed toward the ground. (For all you yogis out there, this should feel similar to triangle pose.) Lift back up slowly, staying in control. Repeat for 6 to 8 reps on each side.
11. Single-Arm Kettlebell Floor Press
Targets: Chest, arms, coreLevel: Intermediate
How to: Lie on the ground with your legs straight. (Nope, it’s not time for savasana!) Grab a kettlebell by your side and, with the palm facing in, press the weight straight up while rotating the wrist (so the palms face the feet). Bring the kettlebell back down to the starting position, and repeat for 6 to 8 reps.

12. Kettlebell Slingshot
Targets: Back, arms, abs, obliquesLevel: Intermediate
How to: No rocks or rubber bands required for this move. Keep feet shoulder-width apart, and hold the kettlebell in front of the body, arms extended at chest level. Swing the kettlebell behind the back with one hand, then reach back with the opposite hand to grab it, swinging the kettlebell to the front of the body. Continue round 'n round for 8-12 reps, then switch directions!
13. Side Step Kettlebell Swing
Targets: Legs, glutes, backLevel: Intermediate-Advanced
How to: This move is like a traveling kettlebell swing—now we’re going places! Grab a kettlebell and start with the basic two-handed swing (see move No. 1). When the bell is down between the feet, step the right foot out to the right; then, when the bell is up, bring the left foot to meet the right (so the legs come together). Keep side-steppin' your way to the right (10 to 15 steps), then head on back the other way, leading with the left foot.
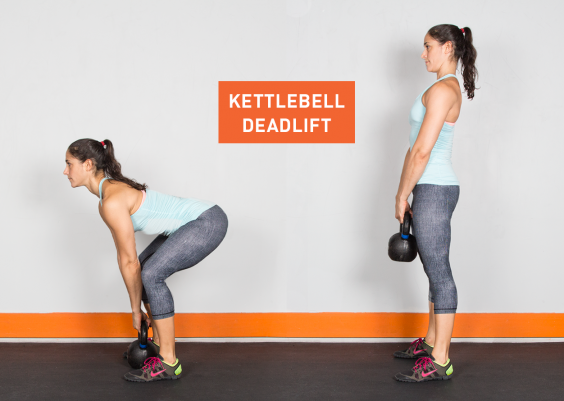
14. Kettlebell Deadlift
Targets: Legs, glutes, arms, back, absLevel: Intermediate-Advanced
How to: Who says you need a barbell to deadlift? Stand with the kettlebell between the feet on the floor. Squat down and grab a hold of the handle with both hands while the back remains flat. Engage the core, tighten those glutes, and keep the arms extended as the body rises on up, kettlebell and all! Aim for 12 to 15 reps, maintaining proper form throughout.

15. Kettlebell Clean
Targets: Legs, butt, backLevel: Advanced
How to: Start with the kettlebell between the feet. Begin to swing upwards: Shrug the shoulders, pulling the body and 'bell up to the shoulder. The 'bell should end in the “rack” position: resting on the forearm, which is tucked close to the body, the fist at your chest. Bring the weight back down to the floor and repeat for 10 to 15 reps.
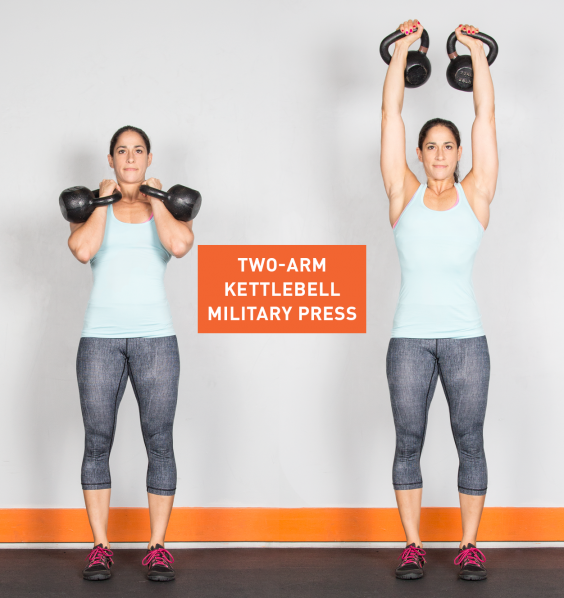
16. Two-Arm Kettlebell Military Press
Targets: Shoulders, arms, backLevel: Advanced
How to: Made it through move the kettlebell clean without breaking a sweat? Grab two kettlebells and clean them to the “rack” position. Then, press the kettlebells up while leaning forward at the waist so the weights are positioned behind the head. Bring them back down to the shoulders and continue pressing for 10 to 20 reps, depending on the weight you’re pushin’.

17. Single-Arm Kettlebell Split Jerk
Targets: Shoulders, chest, back, legsLevel: Advanced
How to: Start by cleaning the kettlebell to the shoulder, finishing with the palm facing front. Next, bend the knees and press the kettlebell overhead while jumping into a split jerk position. (Stay steady!) Return to standing while the kettlebell remains overhead, and then lower the weight. Aaand repeat! Shoot for 4 to 6 on each side for starters.
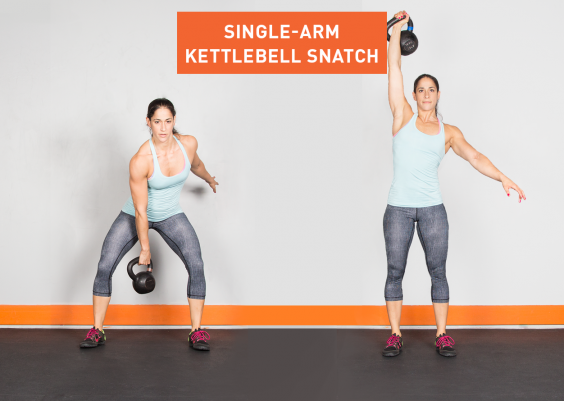
18. Single-Arm Kettlebell Snatch
Targets: Shoulders, chest, backLevel: Advanced
How to: Start with a kettlebell between the feet with the knees bent. Then, explode up onto your toes, pulling the kettlebell until it reaches the chest with the elbow tucked in. From there, bring the weight overhead (hold on tight!). Then bring it back down close to the ground—that’s one rep; try for 6 to 8!

19. Kettlebell Power Plank With Row
Targets: Abs, arms, backLevel: Intermediate/advanced
How to: Think of this move as the fancy plank. Start in a plank position, but with hands grasping two kettlebell handles. Then, lift one kettlebell up so it reaches the hip— remember to keep the elbow in! Lower back down and repeat with the opposite arm. Do 6 to 8 on each side, or until you feel the burn!
20. Kettlebell Half Get-Up
Targets: Abs, arms, backLevel: Intermediate-Advanced
How to: It’s time to get low. Lie down on your back with legs straight out. Extend the right arm straight up, kettlebell in hand. Next, bend the left knee and begin to rise, with the left arm keeping the body propped up. Feel the abs burn? You’re doing things right! Sit all the way up, then carefully return to starting position. Knock out 8 to 10 reps per side if you’re up for the challenge.
21. Kettlebell Push-Up
Targets: Chest, arms, backLevel: Intermediate/advanced
How to: This move is simply a push-up but with kettlebells included! Grab hold of each handle in the usual start position, then lower the body before pushing back up. It’ll definitely feel challenging with those hands on handles rather than on the floor! Shoot for 10-15 reps.

22. Kettlebell Push-Up With Row
Targets: Chest, arms, backLevel: Advanced
How to: Let’s take this push-up up a notch! Begin in a push-up position with the right arm holding the kettlebell. Perform a push-up and, at the top, lift the right elbow by squeezing the shoulder blades together with the weight about six inches behind the body. Then return back to the starting push-up position, pushin’ for 5 to 8 reps with each arm. Kettlebells are a great way to spice up the usual lifting routine. As with traditional strength training, two days a week is a great place to start—but don’t hesitate to weave those kettlebells into the standard weightlifting routine (dumbbells, bodyweight exercises, and cardio included!). Just remember to give each muscle group a break (48 hours should usually do it), and don’t forget to try these out with a trainer before swingin’ solo. Using proper form is key for a workout that’s safe, effective, and fun!
Subscribe to:
Comments (Atom)


